Quick-Start Guide

Stratbox is a collaborative data integration platform in 3D space that allows for the study and annotation of 3D data, as well as the acquisition and sharing of experience and knowledge in a remote collaboration environment, specifically for professionals and academics working in the Energy, Mining, and Infrastructure sectors, amongst others.


Powered by:

IR logo

Technical support: support@imagedreality.com 

Software Installation

The software can be downloaded directly from the website (imagedreality.com/free-trial/) in a zipped format.

To extract the content from the zip file, you can use a free version of a universal zip reader such as WinZip, WinRAR, or 7-zip.

Once the zip content is extracted on the local drive, please run the executable (StratboxSetup.exe) to begin the installation process and follow the instructions.

Create Account/Activate Licence

When Stratbox opens for the first time, the user will be asked to create an account within the app.

Next, a verification email will be sent, followed by a second email which includes a 2-week trial licence key

Back to Stratbox, the welcome screen will ask the user to activate the licence key, and then sign in.

If at this point, if you cannot sign in to Stratbox, you will need to ensure that the email and password are correctly entered and that no firewall or VPN activity is blocking the networking.

Stratbox User Interface (UI)

   1. Cloud & Team Sessions
Cloud Catalogue

To the top left, the cloud folder icon opens a new window that is linked to the cloud system. By default, all new trial users have access to several demo scenes provided by Imaged Reality.

When a model is fetched from the cloud for the first time, a blue bar at the top of the window will indicate the downloading progress. 

Models are fetched in levels of details (LODs) and they will progressively increase resolution until the model is fully downloaded.

Team Sessions
  • Dynamic meeting

Stratbox can be used in a single-user mode, however users can create dynamic, ad hoc meetings by opening the calendar icon and selecting a new Team session.

For participants to join this session, the host can share the unique session ID, found by selecting the :info: button at the bottom blue ribbon.

The host then shares the meeting ID with the participants (via email or such), they can then go to their own calendar, select to join an existing meeeting and then add the meeting ID to join.

Technical support: support@imagedreality.com 

  • Scheduling a meeting

A host can also schedule a meeting “Create a New Event” that will take place some time in the future and add a list of participants in advance. The host can then click on “Create Event” to create an upcoming Session.

Technical support: support@imagedreality.com 

   2. The Bottom Blue Ribbon (Blue Dock)

The third section of Stratbox is the blue dock at the bottom of the window. Here, the user can find useful functions to interact with participants in a team session.

From right to left:

  1. The Home button will reset the camera view to the default location

  2. The Circle-arrow button is the clear scene interpretation tool

  3. The 3 people button shows the list of participants of a Team Session, as is the place from which the host shares interpretations

  4. The :info: button shows the dynamic team meeting ID that can be shared with participants in order to join a team session immediately

  5. The screen-like icon is the presentation mode button, only accessible to the host when in a Team Session. It allows the host to have full control of the participants’ viewports and all movements in 3D space as well as interpretations and observations, which will be shown on the participant’s viewport in real-time

  6. The last button to the right is used when a user wants to leave a team session. This can also be done from the calendar

   3. The Toolbox

The toolbox has functions that hosts and participants use to interact with the 3D Space and edit a model. All tools are best used with a mouse and keyboard.

Tools:

Hand tool

With the hand tool selected and with the left mouse button (LMB), the user can rotate the model in 3D space.

By default, the middle mouse button (MMB) allows for the camera to pan laterally. The middle mouse button is commonly found in the clickable mouse wheel, which otherwise is used to zoom in and out of the scene.

Move tool

The move tool is used to move objects in 3D space. With the tool selected, the user must then select the object to be moved using the arrowed gizmo. The users can choose to move the button or only the image using the space bar.

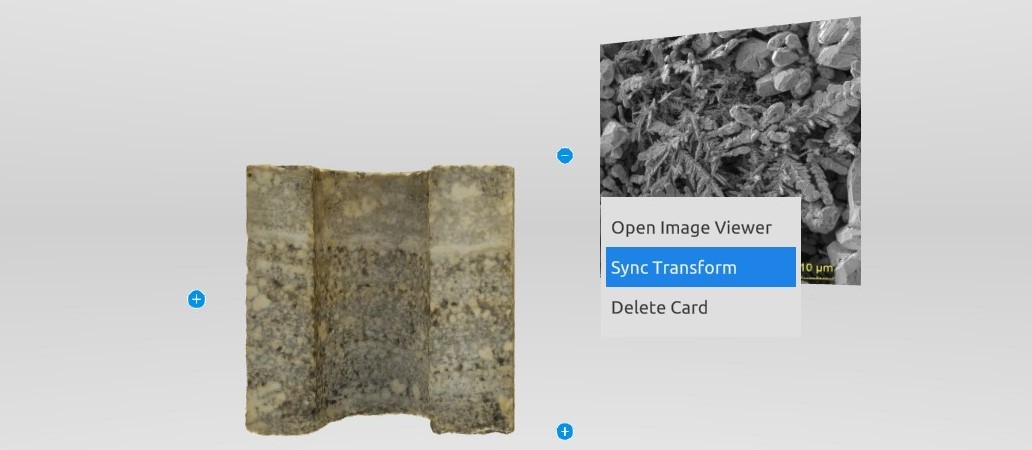
To synchronize the new location of the card with all the participants when in presentation mode, the host has to right-click on the card, where a drop-down menu will prompt the user/host to “Sync Transform”. 

Rotate tool

The process is identical to the move tool. Using the coloured handles of the globe-shaped gizmo, the user can rotate the card to place it correctly in relation to the model.

Scaling tool

The process is identical to the move tool and the hotkeys are the same. Using the coloured gizmo, the user can scale the card to correlate it with another object or model. A card can be scaled relative to a selected axis, but it can also be scaled evenly by clicking and dragging upward the middle (white) box of the gizmo.

Pencil/interpretation tool

The pencil or interpretation tool is used to draw observations directly on a 3D model using the left mouse button (LMB). The tool has additional settings (brush size, colour, mode) that can be accessed by clicking and holding the tool in the toolbox for 2 seconds.

Measuring tool (ruler)

The user can select the tool and click on the left mouse button onto the point from which the user wants to measure, drag the mouse over the area, and then release the left mouse button to take the measurement on the model.

Polygon tool

The user can directly draw a polygon on a 3D object or a card using the left mouse button (LMB). The polygon will close when the user returns to the first vertex.

Text label tool

The user can select the tool from the toolbox and click on a point of a model to create a label. The label is editable, so the user can change/update the text. It is important to position the cursor where the text label is to be located as, once created, it cannot be repositioned.

Angle tool

The tool is a freehand angle tool that will take a measurement relative to the horizontal. The user can select the tool and click the left mouse button on a starting point of the model, drag the mouse over the area, and then release the left mouse button to take the angle measurement.

Erase tool

The user can select the tool and then either click on the interpretation/text label or measurement to erase it, or wipe the tool over the interpretation to remove it from the model. The erase tool has two modes: Erase single interpretation and erase all, which erases all interpretations from the scene.

Undo/Redo

The user can select the tool to undo or redo the last moves in case of a mistake while interpreting.

   4. The Scene and Map Views (top right-hand side of the screen)
Scene Viewport

The first of the three buttons is a mountain-like icon, which activates the scene view where 3D models are shown. In the scene view, the user can use the mouse controls to navigate in 3D space.

Map Viewport
 

The map view button will open a gateway to satellite imagery, which is by default linked to Bings Maps. To switch between 2D (down view) and 3D (perspective giving elevation), the user can click on the map button a second time.

When the mouse is over the 3D map, the user can navigate in the imagery but when the mouse is outside the map (in the white background), the user can rotate the gateway in 3D space. To switch between the two controls, the user can also hit the ALT key (next to the space bar) on the keyboard.

In the map view, the users can find location pins which are linked to the Cloud Catalogue. Hover the mouse over the red pins to see the title and select the pin to open the corresponding model. When two or more pines are close to each other, they will show as a nested numbered bubble.

Additionally, the scenes linked to the catalogue can be filtered using the filter tool to the top right of the screen

The Media Library

Upon installation, a dedicated Stratbox folder is created in the documents directory of the user’s PC. In this folder, directories associated with a local Media Library, save/autosave and configuration files, can be found. The local content of the media library can be directly accessed within the app with a right mouse button (RMB) in the area of the scene.

Saving Scenes

All interpretations and annotations on scenes can be saved in the local media library by hitting right-click in the scene view and selecting to save the scene. The user will be directed to the local media library to save the scene accordingly.

Reset Password

For resetting passwords on Stratbox Desktop, please email support@imagedreality.com

 Will get back asap with a one time link which will direct you to a web form where you can reset your password.